Welcome

Red Bucket Farm is an urban farm on a quarter acre property in an average residential neighborhood. We are located in Wisconsin, USDA Zone 5. We focus on chickens, bees, orchard fruit, and raised garden beds for fruits and veggies. We hope to reduce our footprint on the planet by growing some of our food, reducing our use of fossil fuels, and gardening with sustainable practices. Thanks for visiting!

Thursday, January 12, 2017

Indoor Citrus Trees

Every article and blog I've read about growing citrus trees suggests bringing them indoors for the winter if you live in the north. In my mind, I think of giving them a summer vacation outdoors. For nine months of the year, my citrus trees live inside my house. So far, this project has been only moderately successful.


Almost two years ago, I purchased three citrus trees (Dwarf Venous Orange, Dwarf Key Lime, Dwarf Meyer Lemon). The lemon tree had flowers on it, which indeed produced two lovely fruits. Since then, the trees not been able to produce any other fruit or flowers. Recently, I've learned a few things that I hope will help my citrus trees thrive. 

1. Don't over react to all the caution about watering lightly. In my case, I suspect I was under-watering for too long. Terracotta pots are best because they breathe, which reduces the possibility of over-watering. Water generously and then empty the drip trays after the excess drains. 

2. Use a special citrus fertilizer. Citrus trees tend to suffer chlorosis. The fertilizer I use is Jack's Classic Citrus FeED. 


3. Although my plants are near a window, I can hardly count on Mother Nature to provide enough light. Plant grow bulbs are plentiful---incandescent, compact florescent, LED, red and blue spectrum, and much more. Supplemental lighting is essential. My trees get about 12-16 hours of light per day. 

4. My house is cool, usually around 60 degrees or even a little less where the citrus trees are located. I suspect that my trees would like it a pinch warmer. I've recently placed them on seedling heat mats to keep their roots warm. 

5. Don't bother growing trees from seeds saved from a piece of fruit at the grocery store. They're easy to germinate and grow, but you have a 50/50 chance of growing something wildly sour and icky. 

6. Humidity is important to citrus. If you don't have a humidifier on your furnace, mist the trees frequently or build a humidity tray.

Good luck! If you have tips to share, please comment--I'd love to hear from you! 

Wednesday, November 30, 2016

Difficult Seed Germination

This morning I placed three jelly jars into my refrigerator. Usually my canning jars contain homemade jam, jelly, or even pesto. But this morning my jars contain a mixture of compost and seeds. Don't worry---I labeled carefully!


Some seeds are notoriously difficult to germinate and require extra care. For example, basil and parsley require long germination times and warm root zones. I generally start to germinate them around Christmas for planting in the spring.

Today's project involves lavender, purple coneflower, and purple prairie clover---all attractive to native pollinators. These three seed varieties require a period of cold prior to germination. I could place them in the ground outside and wait for winter to do its work, but since these varieties are fussy, I decided to germinate them indoors. The seeds will "winter" in the refrigerator for a month or so. Then I'll place the soil-and-seed mixture into small pots where they will germinate under lights and be warmed by a seedling mat beneath their roots. Hopefully, all this tender loving care will produce a few viable plants.

What else is in my fridge? Mason bees. Yup. They live there all winter. But that's another blog post for another day. Cheers!

Wednesday, July 27, 2016

Squirrels v. Orchard

Ach du Lieber! The squirrels have invaded our orchard, causing more destruction than any previous year. We're attributing it to a lack of natural predators. Where are the hawks and foxes when we need them?


Our "Reliance" peach tree tends to produce ripe fruit in mid to late July. The squirrels aren't wasting any time taking three bites out of every peach and then dropping them to the ground. In self defense, we have picked nearly every piece of fruit off that tree. The peaches are currently on the large shelves of our plant stand, where they can continue to ripen indoors for a week or two before canning and freezing. Our other peach tree, "Contender" variety, will produce ripe fruit in a month. So far, the squirrels are allowing that fruit to grow.


Similarly, our "Colette" variety pear tree is very attractive to squirrels and so we've harvested that fruit as well. Orchard expert and author Michael Phillips recommends refrigerating pears for a few weeks, and then bringing them out slowly to ripen before use. The brew master at my house says we'll be juicing some of the pears for making perry (a fermented adult beverage using half pear juice and half apple juice).

Thursday, July 21, 2016

A/C for chickens

Today I am so grateful for air conditioning. The weather is oppressively humid and hot. What can I do to help my chickens get through the next few days?


This is my makeshift air cooler. The gallon milk jug is solid ice, and I've placed it in a bucket (red, of course) of water. It's up on blocks which will absorb a bit of condensation as it melts. I have two more jugs of ice in the freezer to rotate as necessary.


We also have a fan in the coop. The girls don't appreciate the air blowing directly at them, so the fan is wired up at shoulder height and aimed into the hen house. Sorry that the photo is foggy, but the dew point is so high that I couldn't get the camera lens to clear.

In addition, I'll be hosing down the chicken yard every few hours and providing plenty of fresh water. To be honest, I worry more about the girls in the heat than I do in the sub-zero temperatures of January!

Friday, July 15, 2016

Netting the Berries

There are three Robin nests and one Cardinal nest on my little urban farm. Last month, those pesky little buggers considered it their responsibility to peck one hole in every strawberry. Now it's the blueberries they love. 


Garden centers sell bird netting designed to protect crops. We've never purchased that kind of netting, but friends recently gave us one large net because they disliked how the netting entrapped little critters, causing panic and torture.

I buy netting at the discount fabric store. There are two kinds of netting: soft netting designed for dance costumes and sturdy netting designed for craft projects. I cut the sturdy stuff into 3 yard lengths and lay it directly over the strawberry plants, tucking in at the edges of the raised beds. This netting lasts for a few seasons before needing to be replaced.

This year we've designed a simple structure of PVC pipe to suspend the netting over the blueberry bushes. The ends are clothes-pinned to the chicken wire fences. One day I noticed a male Cardinal flapping about under one net, but he escaped at the open end and did not return. Success!

Saturday, July 9, 2016

Colorful Beets

In my opinion, the first rule of gardening is grow what you like to eat. And since I love beets, I'm growing three different varieties this summer: Burpee's Golden, Albino, and Cylindra.


I start beet seeds in four inch pots, sowing several seeds in each container. When the seedlings are a couple inches tall, I transfer the entire bunch outdoors into a raised bed. When I harvest, I pull out one clump of beets at a time. I have more beet seedlings in the greenhouse ready to move outside as space allows. I know this isn't the "normal" way of sowing beets, but it seems to work for me.


Peeling raw beets is challenging especially if they are small. I prefer to boil them until they're soft, and then the skins slip off easily with finger pressure. The photo above shows Albino and Golden beets just after peeling.


Last night we enjoyed Cylindra beets, which are deep red-purple, served simply with butter and salt (shown above). We also prepared the stems and leafy greens, sauteed lightly in olive oil and dressed with balsamic vinegar.


Tonight's menu leans toward Asian-style cooking. I've prepared a mix of golden and albino beets along with Oxheart carrots. They're marinating in a ginger-soy dressing, ready to serve in an hour or two. I love how beets are adaptable to various cooking styles.

Fun fact: beets make your pee turn awesome colors. I was just checking to see if anybody actually reads to the end. Happy cooking!


Wednesday, June 15, 2016

Cultivated Elderberries

Elderberries are common in southern Wisconsin. These large bushes grow readily along bicycle and hiking paths, railroad tracks, field edges and highways. Their huge white flower clusters are unmistakable in mid-summer. As the season progresses, the flower clusters become tiny purple berries. Elderberries have been used medicinally for hundreds of years. They are especially helpful in reducing the length of the common cold.


Here at Red Bucket Farm, we've been cultivating elderberry bushes for a few years. We planted two varieties for better pollination, and we sited them carefully in a restricted terrace area. We hoped to disguise the water barrels and hay storage from view while still producing something useful. For a while it worked and we loved the elderberry elixir that we made from the juice.

This year we're learning the downside of cultivated elderberries: they simply do not cooperate! The bushes die back each fall and when they emerge in the spring they don't necessarily grow where they were intended. In their second season, the new stems were close to the intended location, but this year they are sprouting six or eight feet from the correct place. Unfortunately, our style of dense, urban planting does not allow for that kind of freedom. We'll remove these bushes and redesign the water barrel terrace. We still have one or two elderberry bushes way out back where they can happily meander the edge of the woods. But gardeners beware--elderberries like plenty of space to move around!

Sunday, June 5, 2016

Spring Fruit

A photo survey of the orchard this morning reveals several kinds of baby fruits. Can you name them?


Photos from top to bottom: cherries, crabapples, peach, apricot, pear, currants, kiwi. How did you do?

Wednesday, April 13, 2016

Mason Bees


We put the Mason Bees outdoors this morning. They have been in storage in the refrigerator for the winter, where they remain dormant but protected from sub-zero temperatures. (I have other strange things in my fridge, too---acorns, dormant onion plants and seed potatoes. Also hops and yeast, but we consider that quite normal.)

We expect the bees to be active in a few days. They will emerge from their cocoons and immediately begin pollinating. We try to time their emergence with the blooming of early fruit trees like apricot and crab apples. A few of our trees are almost at bloom stage, and the weather looks very promising this weekend.

Mason bees are solitary creatures that operate independently. There is no hive or honey, and they do not sting. They pollinate very efficiently, much more effectively than honey bees. They look a bit like a house fly. The females lay a single egg inside a straw-like tube, pack it with a bit of food and seal it with mud. She continues to alternate additional eggs and mud until she fills the tube.

We have several blocks of nesting tubes that we can rotate for cleaning purposes. I would caution against purchasing mason bees houses that look like tubes of bamboo bundled together. How does one clean those things?

At Red Bucket Farm, we have two Mason bees houses like the one pictured above. Both houses face east to catch the warmth of morning sunshine. The houses are sheltered from rain by the wide eaves of our house. They are situated close to our orchard trees so they don't have to travel far to accomplish their job.

Sadly, we lost all our honey bees over the winter, but that's a different post. See you outdoors!

Wednesday, February 17, 2016

Indoor Citrus

Mid-winter in Wisconsin can be dreary. As an urban farmer, I spend my winter perusing seed catalogs, planning next summer's veggie beds, mapping out crop rotation, and baking lots of pies and tarts with last summer's fruit harvest. 


Last winter I began indoor citrus. I purchased a bag of Meyer lemons from Trader Joe's in January 2015 and saved all the seeds from the lemons. (I also bought a bag of organic limes, only to discover they were seedless. Buyer beware!) I germinated the seeds in a small plastic bag with damp paper towels. It was easy. Then I transplanted the little seedlings into light soil and watched them take off.


To add variety to my indoor citrus grove, I purchased four trees from an online vendor---a Meyer Lemon, a Venous Orange, a Key Lime and a Mediterranean Olive tree. These trees were more mature than the seedlings I had started myself. The Meyer Lemon produced two blossoms and eventually two beautiful lemons. One of them we harvested over the weekend, which you see in the photo at the top of this blog post.


All the citrus seedlings grew rapidly over the summer. In November I transplanted them into slightly larger pots. It's been a challenging winter for my citrus trees. They have dropped nearly all their leaves and generally expressed their displeasure at my care. Nevertheless, these sturdy trees are producing tiny new shoots and leaves where the old ones fell off.

Watering citrus trees is tricky. They prefer dry soil, but not parched. It's taken me months of guessing to ascertain if I'm over- or under-watering. Finally, I purchased a moisture meter with a long probe to help me determine when to water.

This isn't an instant gratification project, but one taste of that sweet lemon juice (yes, Meyer Lemons are sweet, not sour) has motivated me to keep my citrus grove growing. It gives me hope in the winter months.

Friday, August 21, 2015

Epic Tomatoes

Over the winter, I read Craig LeHoullier's new book, Epic Tomatoes (2015, Storey Publishing). I was dubious that I could read an entire book about nothing but tomatoes, but Craig's book is compelling and inspiring; it influenced me to grow a much wider variety of tomatoes than ever before. His focus is on "heirloom" or open-pollinated varieties rather than hybrids. I've learned that if I'm willing to compromise on appearance and shipping/storage qualities, I'm likely to gain in fantastic and unique flavors.


Here is a photo of a variety called Purple Cherokee. The flesh is sweet, juicy and it is indeed purple-ish in color. Notice that this tomato is huge---one pound and four ounces. There are so many varieties of tomatoes to grow. It's ridiculously limiting to buy the few varieties that your garden center provides. We urge you to plan ahead for next year and try something new.

Now I'm back to the canning, freezing and processing that consumes my day. Happy gardening!

Tuesday, August 4, 2015

Ruthless and Strategic

Dee and Cathy have watched Red Bucket Farm grow over the last several years. They are dear friends who have shared many meals with us; they have also laughed and cried with us. So I'm not offended when they refer to my last blog as "the best rant on the internet" or when they describe me as a "ruthless and strategic" urban farmer.


Ruthless and strategic refers to the fact that I don't get emotionally attached to a bush or a tree or even a chicken. For example, we have been attempting to grow gooseberries for years. After two attempts in different locations and about six years invested, we have finally arrived at a crop large enough to produce one fruit pie. And guess what? Even though it was delicious, I'm pulling out those thorny bushes---way too much trouble and space for too little food. It's just a matter of practicality.

Reactions to my last blog (May 29, 2015, The Cost of Gardening) varied widely. Many were stunned and silent, and one person accused me of being hostile. Interestingly, the folks who agreed with me felt the need to do so privately. A friend who operates a small business understood entirely---so many people expect a discount large enough to obliterate his profit. But the most telling response came from a lifelong farmer, a pig expert who I know at my church. When I told him about the cost-of-gardening blog and the responses to it, he laughed out loud and said, "Now you understand the economics of agriculture."

Ruthless and strategic? Yes, indeed.

Friday, May 29, 2015

The Cost of Gardening

When I mention to acquaintances that I'm an urban farmer, they seem to have visions of pastoral beauty---tomatoes dangling lusciously from the vine, bees buzzing around the lavender, vegetable beds neatly weeded, homemade lemonade on the picnic table. Sounds fantastic, doesn't it? And oh, by the way, if you have a surplus of tomatoes, I'll be happy to take some off your hands, they mention casually.

Let's get this straight. Tomatoes do not just happen. Any serious urban farmer works year-round to make it happen. We order seeds in January and begin sowing indoors immediately. We carefully watch the spring weather, cultivating beds, adding compost, and finding the right time to transfer seedlings to the greenhouse for hardening, and ultimately to the beds. Then we watch for bugs and disease, using labor-intensive methods to organically solve problems. Finally, we enjoy the harvest. If we've done our work properly and the weather has been generous, there will be enough to freeze, can and preserve for use all winter long, perhaps even into the next season.


Several years ago, before I was a gardener, my friend Diana gave me one, gigantic sweet onion. It was the size of a softball. I cradled the onion in my hands and planned carefully how to use it in a meal, because I knew the onion came from her garden.

Gardening is like quilting. It's a labor of love. I don't give a quilt to anybody who does not truly understand and appreciate the hours it took to create. Quilters refer to gift recipients as "quilt worthy."

Gardening is not free. At Red Bucket Farm, we have thousands of dollars invested in raised beds, compost bins, bee hives, rain barrels, terracing (both wood and brick), fencing, sheds, coops, greenhouses, trellises, and arbors. We consider this our retirement investment plan. Plants also cost plenty, even when purchased bare root in the spring. Fruit trees run about $25 each, and that's when they are a tiny stick in the ground. It takes years for a tree to become fruitful. Chickens are not free, nor is chicken food.

I don't mean to be ungenerous, but urban farming is my job. Asking for the fruits of my labor is like asking for my paycheck. I'm happy to share with my friends, those lovely folks who pray for me and check on me regularly to make sure that I'm doing okay. I'm also happy to sell a few eggs when the flock is producing abundantly. But please---think twice before making assumptions. Are you veggie worthy?

Thursday, April 30, 2015

Spring Chicks 2015

Spring chicks are a happy event at Red Bucket Farm. Some years we obtain chicks from a local hatchery so that we can drive over and pick them up. This year we opted for more unusual breeds, so we ordered from My Pet Chicken. Our chicks hatched on April 6 and arrived by USPS on April 8.


Baby chicks are packaged carefully with a gel heat pack, but it's a difficult trip. All of our little ones were alive upon arrival, but we lost one within 24 hours. It was disappointing but not unexpected. The plumage (really it's fluff) of little chicks doesn't necessarily reflect their mature colors, so it can be difficult to ascertain which breed is which. We think the one that died immediately was a Partridge Plymouth Rock.

The new chicks are now three weeks old. They live in their brooder box in the basement. A heat lamp keeps them nice and warm. We refill water and food regularly, and check for vent blockage to make sure all systems are operating properly. (That's a nice way of saying that we check for poopy butts.)


This particular flock has seemed more flighty than previous flocks. We suspect that our choice of breeds may be playing into this. We decided to try Light Brown Leghorn, Exchequer Leghorn, Buff Chantecler, Silver Cuckoo Marans and Ancona as new breeds. Some of these breeds have a reputation for nervousness and flightiness.

Late last night I removed their water and stepped to the sink to refill. The girls were scrambling around in their brooder box in their usual panicky manner. Suddenly I heard a loud squawk and returned to find one little chick laying on her side, evidently paralyzed. She died in a minute. It's a mystery to us. Did she have a heart attack or aneurysm? Can a flighty chick die of a panic attack? We think the victim was either the Exchequer Leghorn or the Ancona.

We always order extra chicks so our flock will be strong enough to survive winter. Perhaps we'll try the new breeds again next, or maybe we'll just stick with the hardy heritage breeds. Stay tuned.

Saturday, December 27, 2014

Winter Bees


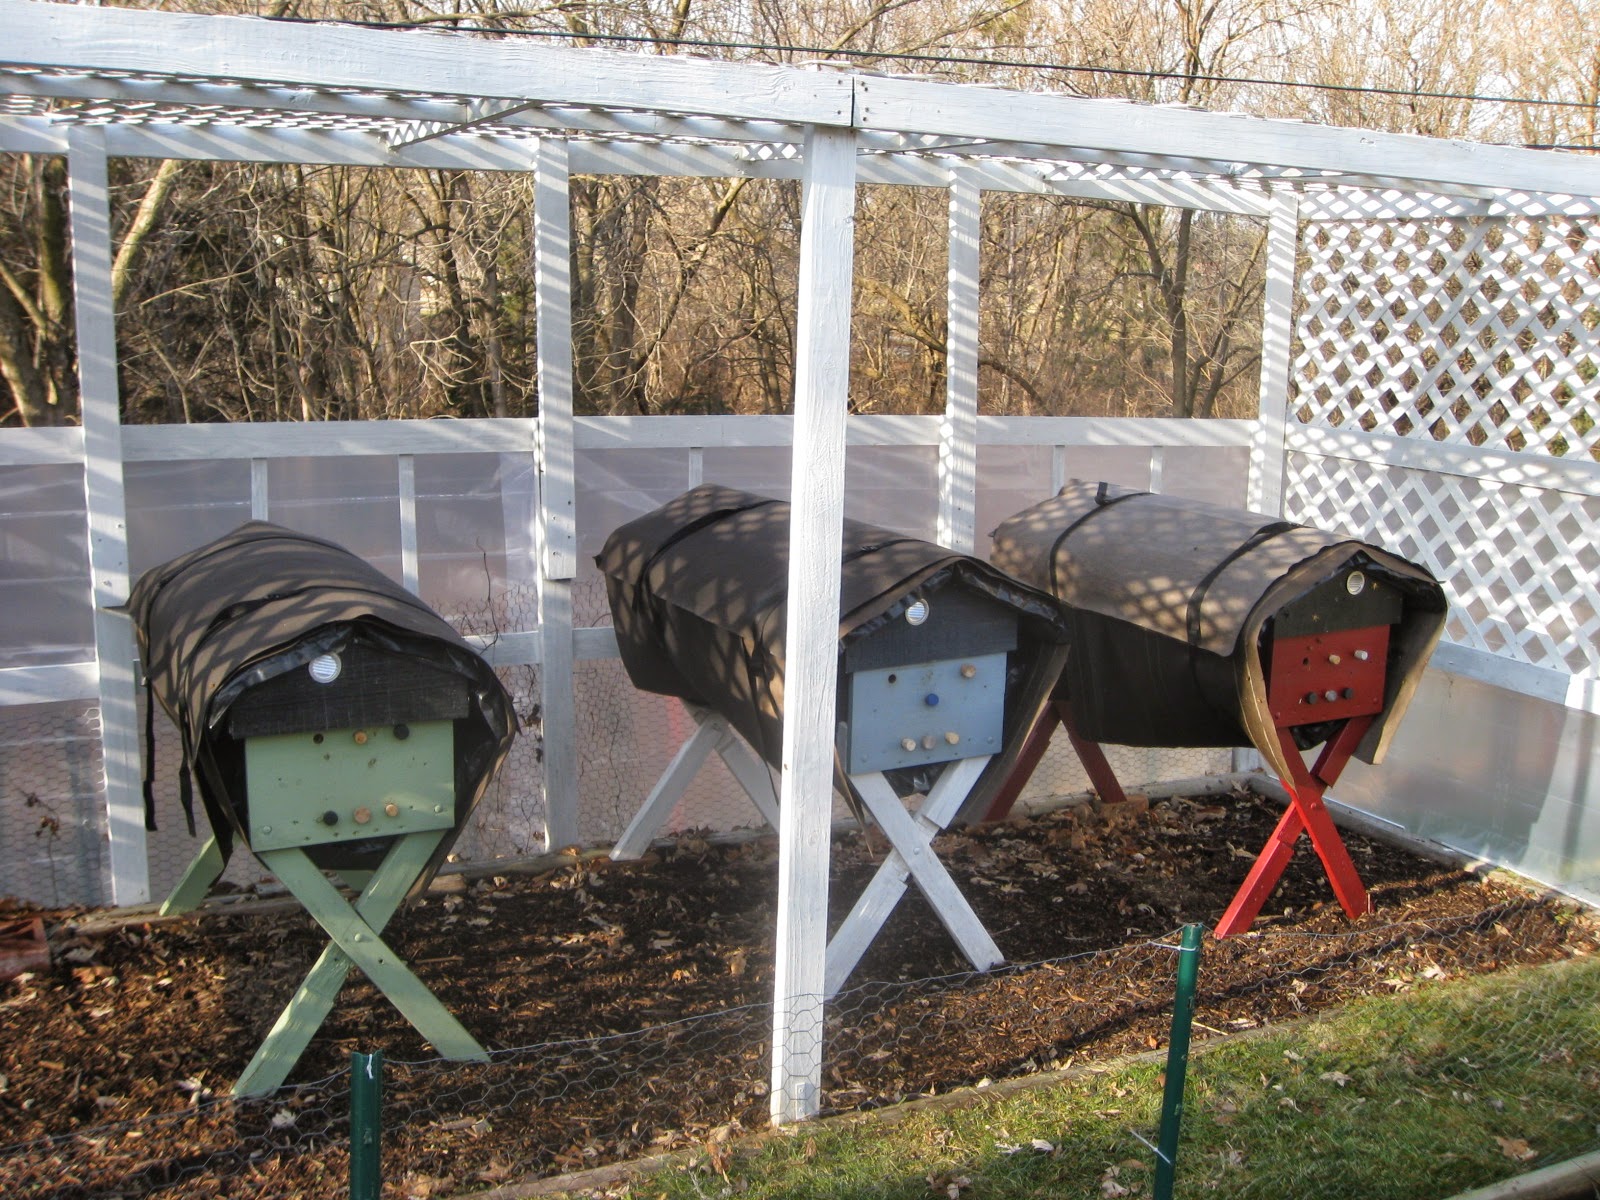
The weather at Red Bucket Farm has been fairly dreadful in terms of our honeybees. Towards the end of October, we covered the hives with insulation blankets and wrapped the entire bee yard with plastic to protect the hives from western winds.

November was just plain cold. Outdoor air temperatures were way below normal, hovering in the teens during the day and close to zero at night. The bees disappeared into the hives where they clustered together in a tight ball around the queen.

December has been warmer but cloudy, foggy, damp and drippy. It's normal for bees to take "cleansing flights" during winter months. They prefer to not poop in their hives and will slip outside on a sunny afternoon for quick trip to the ladies room. Unfortunately, we haven't seen the sun or the bees in weeks---until yesterday. Finally we had a few hours of sunshine and one of our hives took the opportunity to get outside.


This video is about one second long, but you get the idea. (Sorry that I'm not so clever with technology.) We'll be happy if even one hive survives the winter so that we can build and split with the hardy bees that make it. Replacing bees each spring is expensive---about $100 per hive---and we may not be able to justify the expense if they die each winter.

So, at the risk of repeating myself endlessly, if you still use lawn chemicals, please reconsider. Chemicals weaken the bee population significantly. If the bees approach winter in a compromised state, they can't possibly survive. Pollination is tenuous these days, and without it, we all suffer. Backyard bees are better off than rural bees because foraging is more varied, but lawn chemicals are toxic. Remember that dandelions are bee food.

Meanwhile, we have a glimmer of hope that some of our bees are still alive!

Tuesday, November 4, 2014

Planting Garlic

Planting garlic is similar to planting tulip and daffodil bulbs: push them deep in the soil in the late fall and wait for the magic to happen in the spring.


First make sure the soil is loose, friable, and free of weeds. Add a bit of compost and get ready to plant. I placed my garlic cloves gently on the surface of the soil to get a sense of how closely to space them. Then I pushed my garden knife into the soil the full length of the blade and dropped the garlic down. After all were planted, I covered the bed with a layer of hay and watered.

Garlic is the crop that keeps on giving. Two years ago I visited Seed Savers Exchange in Decorah, Iowa, where I purchased one head of Inchelium Red (softneck) Garlic and one head of Eric's German White (hardneck) Garlic. I planted them in October 2012 and saved my entire harvest the next summer without eating a bite.

In November 2013, I separated the cloves from the heads of garlic and planted again. By July 2014, I had 73 heads of softneck garlic (about 3.75 pounds) and 31 heads of hardneck garlic. From that harvest, I reserved five heads each of hardneck and softneck for replanting. The five heads of hardneck garlic separated into 17 large cloves; the five heads of softneck garlic separated into 62 small cloves.

I learned that garlic slowly adapts to its micro climate, so my garlic is now Red Bucket Farm garlic, specific to my little piece of paradise. Garlic smells fantastic even when planting, and it's not too late to plant this fall. What are you waiting for?

Thursday, October 30, 2014

Drying Herbs

As the growing season slowly comes to an end, I'm experimenting with drying herbs for cooking use as well as for my chickens.


A farm colleague has suggested that using dried herbs in the hen house over the winter will help discourage mites or creepy crawlies and will certainly help the fragrance in that crowded space. For that goal, I've been harvesting the herbs that are underplanted in my front yard orchard--oregano, lemon balm and lavender. It's important to keep these herbs separate from those designated for human consumption because the front yard is subject to every dog in the neighborhood. 'Nuff said?

Other herbs at the farm have been living comfortably in the green house--basil, sage, rosemary, and chives. These I can dry and crush, then store in jars in the kitchen.


The process of drying herbs is simple. I cut the stems into a size that will fit in my large roasting pan and place it in a cool oven at 140 degrees Fahrenheit with the fan running. (I have a convection oven.) I prop the oven door open an inch or so to allow moisture to escape, checking on them periodically. The timing will vary depending on the herb and quantity being processed. When it all seems a bit crunchy, I take it out of the oven and gently pull the leaves off the stems. Then I crush it with my hands and place it in storage containers. The herbs for use in the hen house are stored in large plastic bags in the freezer.

Drying herbs in the oven makes my house smell fantastic. It's quicker than the traditional method of hanging bunches of herbs in the basement or garage, which (for me) usually results in messy bits of dropped leaves and stems. Give this a try!

Tuesday, October 7, 2014

Bee Hatch


The red hive in the foreground and the green hive in the background are both exhibiting new hatches of bees. Notice most of the bees are taking short flights in little circles right at the hive entrances. These are known as orientation flights as the new bees get to know their surroundings. Soon these bees will begin taking longer flights.

Although the hives are slimming down in preparation for winter, it's good to see new bees and know that the queens are all alive and well.

Thursday, October 2, 2014

Fall Crops

One of the challenges of urban farming is learning how to keep all the garden beds productive through the fall months.


This morning's harvest was a continuation of late summer crops---tomatoes, beans and elderberries. About two dozen butternut squash remain on the vines. The fall-bearing raspberries ("Heritage Everbearing") are producing heavily, unlike the summer raspberries ("Nova" and "Latham") which produced almost nothing. We're not sure if that is the result of a harsh winter or uninformed pruning.

After harvesting potatoes, onions and garlic in mid-summer, I replanted those beds with bok choy, spinach, Swiss chard, scallions and beets. Most of these were started by seed in the greenhouse and were ready for transplant when the root crops were harvested. This is the tricky part---knowing when to seed so fall crops are ready to transplant to available beds. I've found that sowing fall crop seeds in the greenhouse in early July is helpful, and sowing seeds outdoors in the beds no later than mid-August is most productive. Any later than that, and our daylight is just too limited to get those seeds germinating even if the weather is cooperative.

Now I'm off to the kitchen to process my crops for winter storage.

Monday, August 18, 2014

Growing Shallots


Shallots have never been a part of my menu planning. I've heard of them, especially when watching cooking shows on television. But they are difficult to find in the grocery store and quite expensive for something described as a "mild onion." Just use a little onion or scallion, right?

In December I decided to educate myself about shallots so I added them to this year's garden plan. I chose Zebrune shallot seeds from Seed Savers Exchange. Zebrune shallots are a heritage variety from France. It's called a banana shallot because of its long shape. The bulbs are pinkish-brown and store well.

Just after the new year, I sprinkled shallot seeds in four inch pots and placed them under lights in the basement. Each time their green tops grew a few inches tall and began to flop over, I would give them a little haircut. In early May, I gently teased the little bunches apart and planted them individually in a raised bed outdoors. They grew tall and strong and without drama. Last week I harvested them and placed them in the sun to dry.

Truth be told, I can't quite figure out why this is a big deal. Shallots grow every bit as easily as onions and scallions. The bunnies and chipmunks leave them alone and they don't require any attention at all. It's a no brainer. If you haven't tried growing your own shallots, I recommend adding this to next year's wish list.