Welcome

Red Bucket Farm is an urban farm on a quarter acre property in an average residential neighborhood. We are located in Wisconsin, USDA Zone 5. We focus on chickens, bees, orchard fruit, and raised garden beds for fruits and veggies. We hope to reduce our footprint on the planet by growing some of our food, reducing our use of fossil fuels, and gardening with sustainable practices. Thanks for visiting!

Friday, April 29, 2011

Installing Bee Packages

This noon we installed two packages of bees into our top bar hives. It was very exciting. We tried to get everything organized that we would need to accomplish the task---tools to open the packages, remove the cans of syrup and open the queen cages. We started without any protective clothing but quickly found our old mosquito netting hats for protection.


We opened the green colored hive and removed several top bars to make room to work. We carefully pried the top off the package and began gently lifting the can of sugar water out of the box.

After the sugar can is removed, we could grab the tab on the queen cage, which unforunately broke and the whole queen cage fell into the box with 10,000 bees. My brave teenaged daughter reached in and carefully rescued the queen cage.

The next step is to remove the cork covering the candy plug at the end of the queen cage. Both ends are corked, and we were supposed to remove the cork allowing the worker bees access to the candy plug. The theory is that by the time the bees have eaten the candy plug, they will have bonded appropriately with the queen and will no longer want to kill her as if she was an intruder. Unfortunately, in our ignorance we removed the wrong cork and inadvertently released the queen and her six attendants directly into the hive without protection. It all happened so quickly and my instinct was to get her quickly into the hive before we lost her entirely.

After that, it was simple. Shake those bees into the hive.

Replace the top bars. We tried to make sure there were no stragglers when we replaced the roof cover.

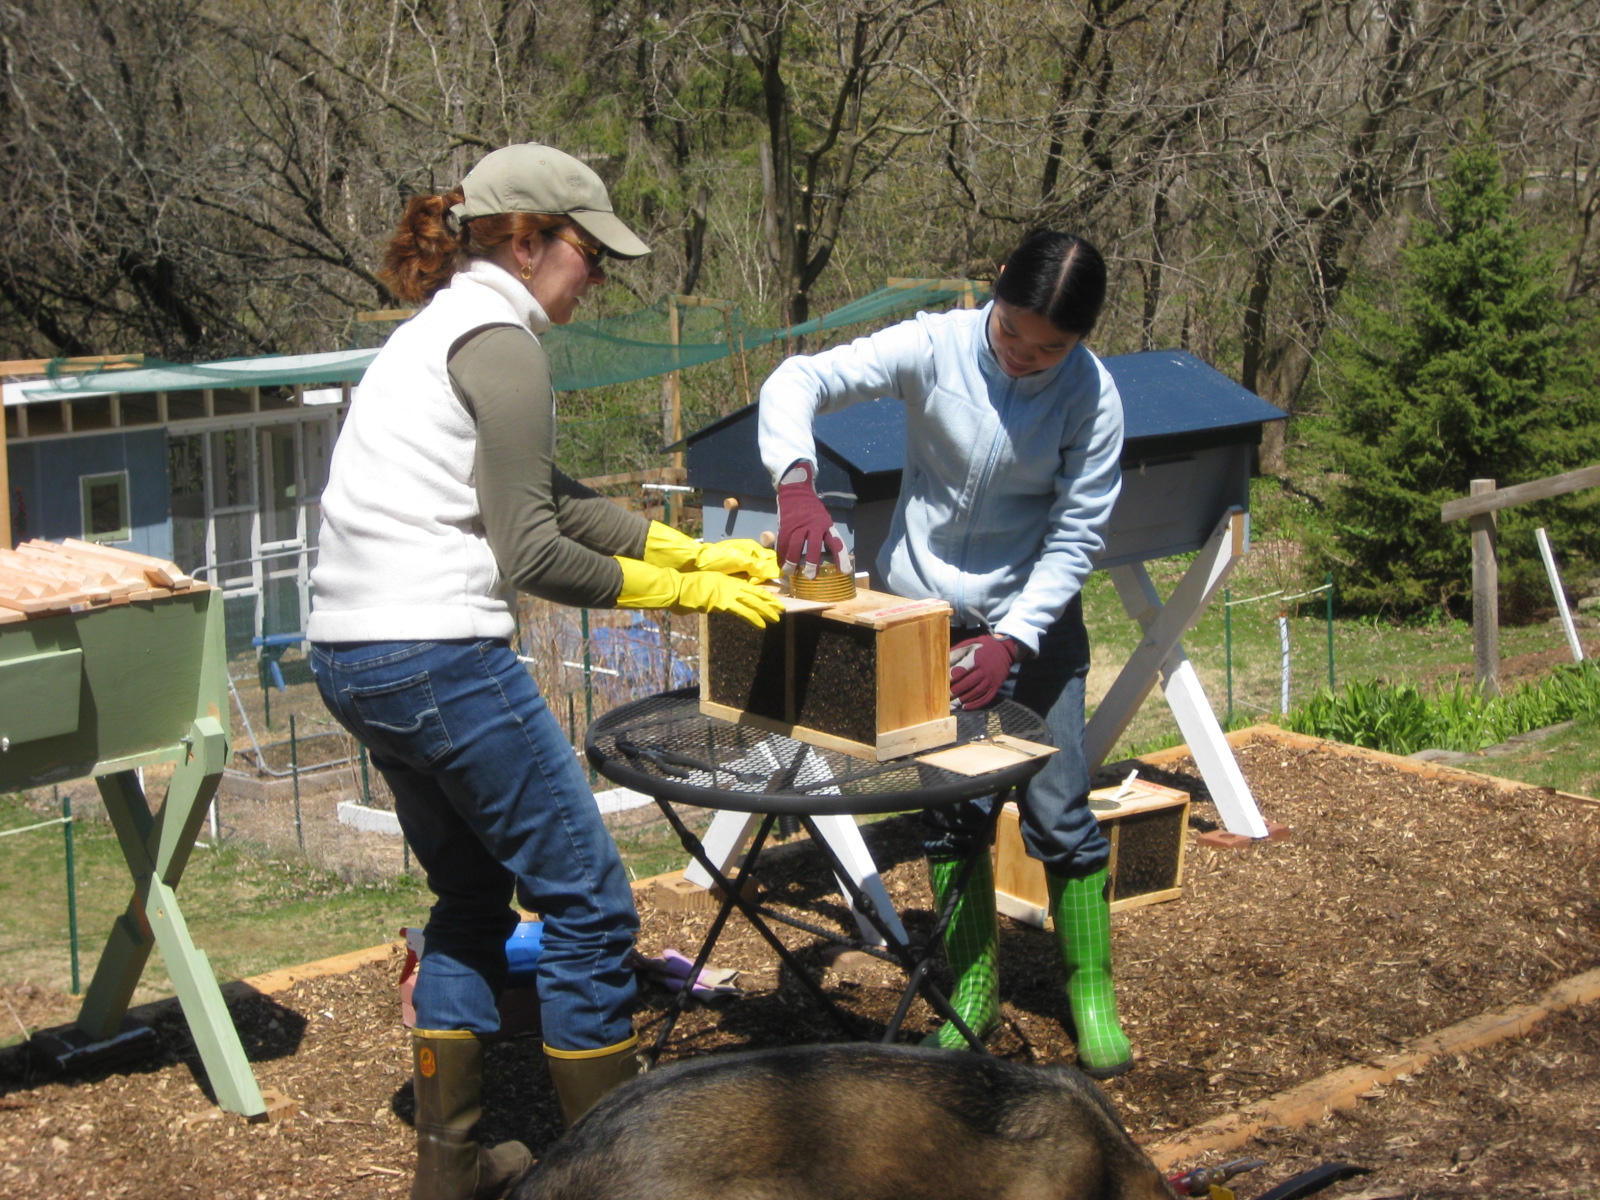
Then we moved on to the second hive, stained blue in the background. This installation went more smoothly now that we had one under our belts. The syrup can came out with some difficulty because the bees had begun to draw comb inside the packages and had already "glued" the can into place with propolis.

Guanshan is holding the queen cage, which is covered in bees. Cool, huh? Please notice that we didn't drop it into the package this time, nor did we uncork the wrong end. This queen cage is hanging properly between two top bars.

Shaking bees is kind of fun and very exciting.

Finally, we replaced the top bars and the roof on the blue hive and called it a day.

This is a piece of the comb that the bees had drawn inside their shipping package.


Thursday, April 28, 2011

Bee Packages Arrive

The phone call came at 7:45 this morning informing me that my packages of live bees were at the postal annex ready for me to pick up. The voice on the other end sounded calm and somewhat bored. I wondered if this was a common occurance.

We ate breakfast quickly and drove over, somewhat nervous about what awaited. When the postal worker came to the counter to help us, I introduced myself.

"I'm the Bee Lady," I said simply.

"Oh, thank God," she exclaimed loudly, and immediately turned to the back room without checking my identification. I think she would have given those boxes to anybody who wanted them.
The two boxes of bees were held together with lath strips forming one package. The bees inside were huddled around their cans of sugar syrup and presumably the queen cage, which we haven't been able to see. They moved slowly, too cold to generate very much buzzing. The bees will cluster together to stay warm---about ninety degrees inside the hive. There were only a few dozen dead bees at the bottom of the box, which is normal, and one lonely bee hanging on to the outside of the box. Poor thing has been clinging for hundreds of miles.

We set the packages down on the sidewalk outside and sprayed them with sugar syrup, which initiates a grooming response. Then we placed them in the trunk of the car and brought them home.

Unfortunately, it's forty degrees and raining today, which is really lousy weather for bees. It needs to be at least 45 degrees for the bees to take flight. Tomorrow's weather is predicted to be warm and sunny, so we decided to store the bees in the basement for a day. (Our garage is too cold.)

Our indoor cats are fascinated by the bees, so we're monitoring that closely. I'm not worried about the safety of the cats; it's the bees I'm concerned about.

The bees have warmed up a little in the basement, which is about 58 degrees. They're making a pleasant humming sound, and the cluster is constantly moving to stay warm and rotate all the bees to the warmth in the center. The single bee on the outside of the package is still hanging on and moving around, and I don't think she'll leave the group. We'll spray them with sugar water to help feed them.

We expected this might be slightly scary business, but so far it's interesting and not at all frightening. Stay tuned for tomorrow's installation in the hives.

Tuesday, April 26, 2011

Bee Ready

Yesterday my two packages of honeybees were shipped from Long Lane Honey Bee Farms in central Illinois. I'm expecting delivery any time this week. It's been difficult to prepare for the delivery of bees this spring because of unseasonal snow, many days of dreary rain, and temperatures well below average.

Last night my team worked feverishly to make our final preparations. First we needed to finish building a level bee yard in our steeply sloping backyard. They made one more trip to the building supply store for landscape timbers and quickly had this finished.

Next we used a builder's level to make sure the hives were completely level. Since bees build comb perpendicular to the center of the earth, it's critical to make sure the hives are level. If the bees build crooked comb or "cross comb," the whole hive can quickly fuse itself together into a mess that's impossible to inspect or harvest.

By suppertime the bee yard was ready and the hives were installed. After dark, we melted a chunk of beeswax in a double boiler and painted a line of wax along the top bars exactly where we hope the bees will build comb.

The last thing to get ready is to prepare sugar water to use in a spray bottle. Sugar water will distract the bees into a grooming habit. This is in lieu of smoking them, which confuses them. I also need to prepare some sort of feeder for them. Many folks use sugar water in a jar feeder, but I think I'll provide honey instead.

Now I'm just waiting for the call from the post office asking me to pick up my packages. And yes, I'm a little nervous!

Tuesday, April 19, 2011

Solar Clothes Dryer

Today is National Hanging Out Day as organized by a group called Project Laundry List. PLL is a nonprofit that advocates line drying as an alternative to clothes dryers. (http://www.laundrylist.org/)

Did you know there is no such thing as an Energy Star clothes dryer? If you're like me, you've been upgrading your home appliances to be energy efficient, but clothes dryers suck so much energy that none have been determined to be highly efficient by the Environmental Protection Agency.

I use my gas powered clothes dryer as little as reasonably possible. I'm not a martyr about it, though. I hang laundry outside whenever there isn't snow on the ground, usually March through November.

I love hanging laundry outside! The birds sing to me and the chickens call from their coop. I never hang out socks and underwear. I'm just not that bored. But I do hang dozens of shirts and jeans every week, and the smell of freshly air-dried bedsheets is heavenly.

For those of you who live in neighborhoods that restrict clotheslines, it's time to get creative. You can set out folding drying racks on your patio or deck. Or use a hammock stand or other household item to prop up your drying laundry. Finally, it might take some activism to educate your neighborhood association to allow natural clothes drying as the right alternative.

In the winter, I try to hang some of my wet laundry indoors. My mother-in-law used to have ample indoor clotheslines in her basement. She said it saved energy and humidified her house at the same time. I don't have quite as much space as she did, but I'm learning to hang dress shirts neatly buttoned on hangers and suspend them on a rack. Jeans hang from a clothesline in the workshop. It's not a perfect system, but I figure that every little bit helps.

Today it's snowing, so I'm off to hang clothes in the basement. I hope you'll consider it, too!

Saturday, April 16, 2011

Rosie the Egg Machine

This morning, Rosie layed her 200th egg. We think she's amazing.

Rosie is our Red Star (red sex link), a hybrid chicken designed for good egg production. She was hatched May 17, 2010, and laid her first egg on Sept. 22, 2010. It's early to begin laying at only four months of age. Today she produced her 200th egg in 207 days. She takes a very occasional day of rest.

Our thanks to Rosie for all her hard work!

Thursday, April 14, 2011

Trellis Recycled

Sometimes the garden industry drives me crazy! There are a ridiculous number of gadgets, tools, whidgits and whatnots all designed to help make the job easier and the wallet slimmer. It doesn't take long to figure out that we must get creative or go broke.

I planted snap peas this week. Last year's crop was yummy but nowhere near large enough, so this week I sowed a larger portion of one raised bed. I also built myself a large trellis to support the pea vines. The framework for the trellis is an abandoned backyard soccer goal which we found at the side of the road on garbage day in our neighborhood. I covered the goal frame with chicken wire fastened with plastic zip ties. I planted two double rows of peas on each side of the trellis.

Reduce. Reuse. Recyle. It's free and it's the right thing to do.

Tuesday, April 12, 2011

Spring Cleaning

Most people associate spring cleaning with an annual ritual of house cleaning. I suppose one might clean windows, kitchen cupboards, perhaps even the closets. How would I know? I never do it. Spring cleaning at Red Bucket Farm means a complete cleaning of the chicken house. It's important to clean thoroughly twice a year to prevent mites and other visitors from settling into cracks and crevices.

We were lucky to have unseasonably warm weather over the weekend, so we seized the opportunity. My work crew removed all the exterior plexiglass and plastic sheeting which was installed mid-November for winter protection. I hauled out every shred of bedding (wood shavings and hay) which was littered with poop. It all went into the compost bins which were relocated slightly. I scrubbed the entire casa gallina with a mild solution of bleach water and added clean bedding.

The girls seem happy with their clean housing with one exception: they really hate it when I mess with the nesting boxes. I removed one wooden box that hadn't been used in months, and I had the audacity to move the favorite nest a few inches. Yikes! The complaints and squawking have been considerable. I guess you can't keep everybody happy all the time.

Wednesday, April 6, 2011

Homegrown Sprouts

A couple of weeks ago I was reading an article in Chickens magazine. (Yes, there really is a Chickens magazine. You can find it at http://www.chickensmagazine.com/) The article promoted feeding fresh greens to chickens for healthier and happier animals, and it causes their eggs to be more nutritious. For those of us without pasture space, author Cynthia Amidon suggests sprouting seeds, which evidently chickens adore.

It seemed like a good idea, so I hopped on the internet and read a few articles about sprouting seeds. My favorite website was http://www.sproutpeople.org/. I measured three tablespoons of alfalfa seeds into a quart canning jar, washed and soaked for 12 hours, then rinsed and drained twice a day for about five days. Soon I had a full quart jar full of lovely alfalfa sprouts. It was simple.

Next I made hummus and baked flatbread. Combined with the crunchy green alfalfa sprouts, this created delicious and nutritious sandwiches that the whole family enjoyed. The only problem was that the chickens only got a few tablespoons of sprouts because we ate them all. So now I'm back to washing, rinsing and draining more sprouts. Maybe this time we'll share some of them with the chickens.

Tuesday, April 5, 2011

Banished Hen Update

During the month of February, we experienced some trauma in our backyard flock. Hyacinth the Easter Egger was being bullied by Delphinium the Dominique (a traditional American breed). You can read the full account at my March 2, 2011 blog posting called "Happy Chickens Lay More Eggs." The end result was that Delphinium moved away from our farm and found a new home at a nearby hobby farm. We were sad to see her go, but it was in the best interest of the flock.

I confess that I was worried about Delphinium's safety. Her new farm in the country isn't as secure as our urban farm, and I wondered if Delphinium would get taken by hawks, owls, coons, or simply a passing automobile.  Fortunately, we get regular updates about her and the news is good.

Delphinium has been roosting safely in a tree at night. For a few weeks she laid eggs wherever she wanted, which meant that the coons were enjoying her work. Lately, she's taken to laying eggs in the seat of the lawn tractor, where the new owners can readily gather eggs. She hangs out on the front porch of the farmhouse and greets her new owners when they arrive home. She even visited the neighboring farm while they were lambing a week or two ago.

Until yesterday, Delphinium has been the only chicken on her hobby farm, but now she has become a flockmate to twelve new pullets (almost mature hens). It will be interesting to learn how well she integrates into a new flock. We're hoping that Delphinium will continue to have a good life in the country.

Monday, April 4, 2011

Growing Chicks

Our six chicks hatched a week ago and all are doing well. They live in a brooder box in our tiny home office.
We built the brooder box a year ago, a plywood box with tall sides and a wire hardware cloth cover. The box disassembles for flat storage. Last spring we brooded the chicks in the garage during May and June, but we're ahead of the game by several weeks this year and decided it was far too cold in the garage. We can check on them frequently in the office, and we keep the door closed to prevent cat mischief.

Temperature is a big issue when raising little chicks. For the first week, they need to be 90-95 degrees, as if they were sleeping beneath a good broody hen. We provide heat with heatlamps and adjust the temperature with different wattage bulbs.

The girls have wood shavings for bedding. We covered the shavings with paper towel for the first week to keep them from ingesting it. They eat Purina chick food and lots of fresh water.We freshen their water frequently because it heats up in the warm brooder box and they prefer cool water.

Every day we watch for signs of pasty butt. Yes, that's really what it's called. Little chicks run the risk of having their vent blocked by dried poop. This is quickly fatal so we check regularly and gently wash chicky butts with warm water. You didn't think this was ick-free, did you?

The girls have been busy working on pecking order in their little flock. So far, Rhoda the Rhode Island Red seems like she's the boss, but Daisy the Delaware is no wall flower. (I'm cracking myself up!) Poppy the Partridge Rock is still the littlest and we watch out for her. Crocus the Easter Egger has had pasty butt, and we washed Daisy's butt the other day, too. Petunia the Barred Rock is Madame Mellow and doesn't let much of anything bother her. Squill the Speckled Sussex seems like the entertainer of the crowd.

So that's the chick update. If you're in the neighborhood, stop over for a quick peek. The babies are growing wing feathers and teeny little tail feathers are beginning to sprout too, so don't delay!