Welcome
Red Bucket Farm is an urban farm on a quarter acre property in an average residential neighborhood. We are located in Wisconsin, USDA Zone 5. We focus on chickens, bees, orchard fruit, and raised garden beds for fruits and veggies. We hope to reduce our footprint on the planet by growing some of our food, reducing our use of fossil fuels, and gardening with sustainable practices. Thanks for visiting!
Tuesday, February 14, 2012
Lighted Plant Stands
'Tis the season, folks. It's time to get those seedlings started. I could remind you of how much money you'll save by starting your own plants by seed, and how many more varieties are available by seed than the little transplants at your garden center in the spring. But you already know all that. The biggest challenge to starting seeds indoors is getting the growing conditions right. It's all about light, temperature, soil and nutrition.
Today let's think about lighting. Perhaps your house has a lovely south-facing window with tons of good light. Lucky you! Most of us will need to use some form of artificial light, generally florescent bulbs situated within a few inches of the seedlings for 14-18 hours each day.
I'm lucky to own a commercially made lighted plant stand. I bought it years ago for my tropical bonsai trees to live on during the winter months. The cart was a little pricey, but it's positively plebeian compared with the latest gear designed for indoor gardening---metal halide or high pressure sodium lamps, reflectors, fans, pumps, and more fancy stuff than you can shake a stick at. By contrast, at Red Bucket Farm we excel in low-tech solutions.
My commercial plant cart is pictured above. It has three removable trays in fixed positions, each with a florescent light fixture above. The fixtures move up and down so I can snug them up close to my seedlings. We've retrofitted the cart with reflective insulation wrap around the side and back. We've also added some plastic poultry netting on the side to keep the cats out. The front is usually covered with 6-mil clear plastic to hold in humidity and keep out the critters. Sometimes I use a little fan to encourage air circulation. Yellow stickies help keep the gnat population under control, and the heated seedling mat is concealed beneath the new starts.
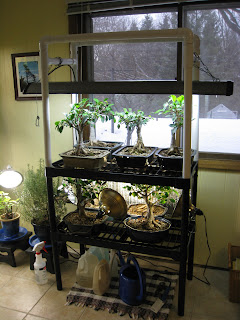
This photo shows our improvised overflow plant stand. The tropical bonsai trees will have to tolerate their new home for a couple of months until the seedlings move outside to the greenhouse. This stand is made from a cheap plastic 4-shelf unit purchased at the home supply store. We bought this for the greenhouse, and use it as two 2-shelf units which fit beneath the knee walls of the greenhouse. Indoors, it has become a lighted stand with the addition of some pvc pipe, a few elbows and T-joints, and a shop light fixture. We didn't glue the joints so it will be easy to disassemble and store. This kind of flexibility is an advantage as the seedlings grow and move outdoors. In a few months, all the plants will be outside and both lighted carts will be cleaned and disassembled. If you haven't the space for a plant stand, you could make a tabletop fixture just large enough to elevate one shop lamp over your seedlings.
However you choose to illuminate your seedlings, the time to start is soon. Good luck!
Labels:
indoor gardening,
seeds
Subscribe to:
Post Comments (Atom)


It looks like you've come up with something that really works...thanks.
ReplyDeletewhere did you get the drip pans for that cart?
ReplyDeleteHI Charlie! The plant cart (in the second photo) was sold as a unit---frame and drip pans all together. Shop online for a whole unit, or just get creative like we did (in the last photo). Good luck!
Delete